Image Resolution
To get the best results and to avoid the risk of pixellation, we recommend using an image resolution between 225 dpi and 300 dpi for offset printing. If your images are in Bitmap format, the resolution has to be between 450 and 1200 dpi.
For digital printing, the minimum acceptable resolution is 150 dpi.
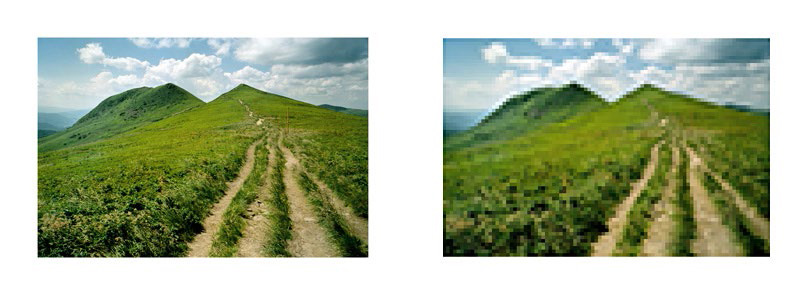
See here on the right a low-resolution image where the pixellation effect is clearly visible.
Bleed
We recommend that you allow for 5mm bleeds. Enlarging the background images beyond the print edge will prevent trimming defects that could lead to the appearance of white lines around the edges.
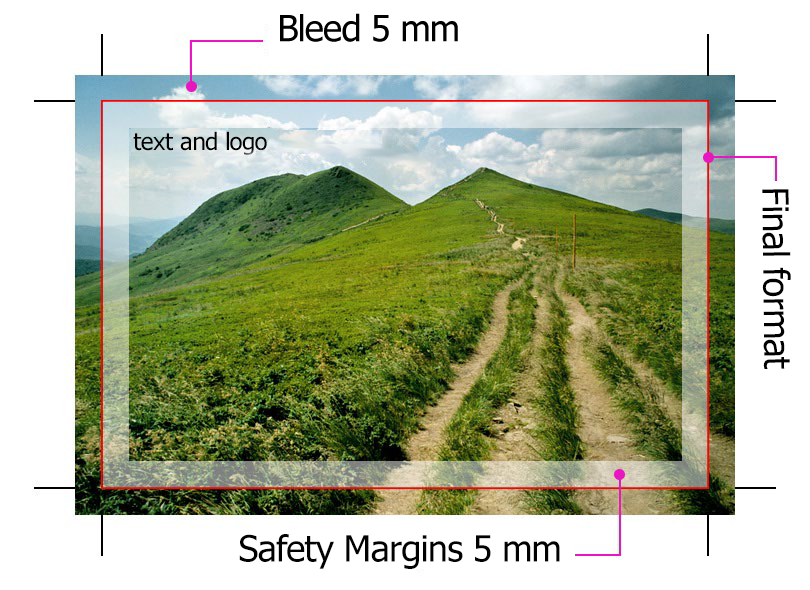
Safety Margins
We recommend that all the important elements (text, logos, etc.) be placed at least 5mm away from the trim.
Ink coverage
In CMYK colour mode, you can add up the values of all 4 components (cyan, magenta, yellow and black) to find the total ink coverage. To avoid issues with ink transfer during printing or binding, please ensure that the total ink coverage does not exceed 280% on uncoated papers and 300% on coated papers.
Black text
The black text in your documents should be 100% black without any yellow, magenta or cyan. This will help you to avoid the superposition of the 4 CMYK colours.

Flattened Texts
We advise you not to flatten your texts or to convert them into images. Text that is converted into an image may come out blurred or have jagged edges.
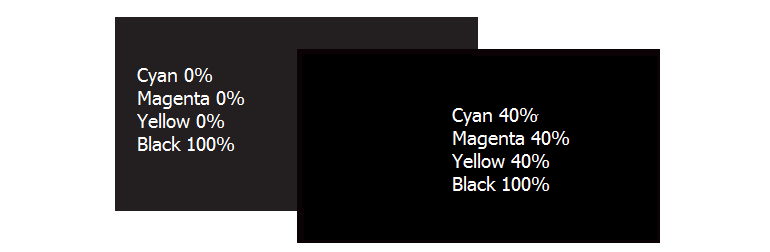
Rich Black
A purely black background is not enough (when printed it looks greyish). We would suggest creating a composite colour that is 100% Black, 40% Cyan, 40% Magenta and 40% Yellow. That creates a much darker and deeper black without excessive ink coverage.
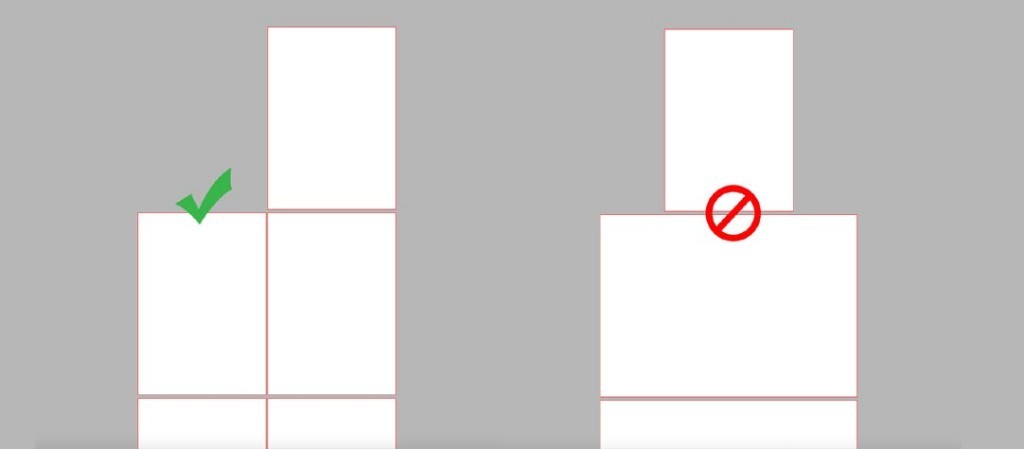
Frames
We discourage the use of frames, as that creates the risk of images that do not look perfectly centred after trimming.
Inner Pages
The PDF of the body should consist of single, consecutive pages starting at page one and continuing in the direction of reading. Please export the pages page by page, not by spread. Please advise us if you are using a colour other than 100% Black (for example, grey, or a spot / Pantone colour) If any part of the content is to be printed on a paper different to the paper of the main body, we’d appreciate it if you could send those pages as a separate file.
Paperbacks
The cover should be designed and assembled to include a spine. The width of the spine varies according to the number of pages and the bulk of the paper.
Files for the cover:
Front = p4 of the cover + spine + p1 of the cover
Back = p2 of the cover + spine + p3 of the cover
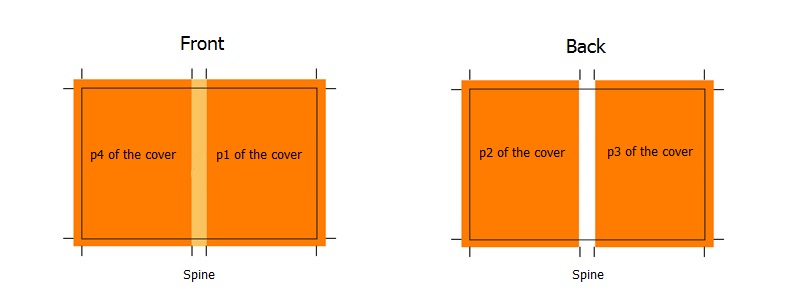
The important text has to be positioned at least 7mm away from the crease.
Hard Cover
Once the content is printed, you’ll be provided with a template that indicates the dimensions of all the necessary elements. Please note that the bleed should be 20 mm since the cover material (paper, cloth, or leather) folds over the board.
Why is it not possible to calculate the exact spine width in advance?
According to the standards adopted by all the leading paper producers, the bulk of the paper may vary from +5 to -5%, and its weight may vary from +3% to -3%. Thus, remaining 100% compliant with the standards of the paper industry can lead to a difference of up to 8% for the same paper, the same producer and the same supplier. That translates into a deviation of up to 1mm for a 200-page book, and that is important in the adjustment of the spine. The best solution is to measure the spine once the body of the book has already been printed.
If we can adjust the design of the spine, we will do it ourselves, but whenever this is not possible (if there is a logo whose size must be modified, for example), we leave the task up to your designer. For section sewn or case-bound books, it’s even more complicated, since the thickness of the spine depends on the pressure that the trimming machine will exercise on the body of the book.
Lines
Please do not use lines that are too thin, as they might not come out correctly when printed. It is recommended that the lines be at least 0.25 points.
Accepted Files
Please send your files as print-ready PDFs. This format prevents corruption of your fonts, images and graphic elements.
Other acceptable formats are:
EPS (vector)
PostScript
TIFF (the file should not contain any text)
WORD, EXCEL, Open Office or PowerPoint are not suitable formats for offset printing. You can still send files in those formats for us to convert to print-ready PDFs but, depending on the files, an additional hourly charge will apply. It is necessary to send us all the fonts and images used. In order to prevent any errors caused by the conversion, a validation of the print files is mandatory.
You can also send InDesign or QuarkXpress files from which to generate the print-ready PDFs. The applicable surcharge is 20GBP.
For Indesign files or QuarkXpress, you must create a package to ensure that the images and fonts are saved within the package folder.
For Apple Mac fonts, please archive them in ZIP, RAR or SITX.
Fonts
The fonts should be embedded. If they are not, there is no guarantee that they will come out right when printed.
Multiple Master (MM) fonts should be converted to curves/outlines.
Filenames
File names should not contain special symbols (i.e. à é œ * < > ? : ; / etc.)
Colour Space
The files should be in CMYK (cyan, magenta, yellow, black), without ICC profiles (the colour profile should not be embedded).
Spot or RGB colours are not compatible with CMYK offset printing. Conversion to CMYK must be done. This conversion results in more or less pronounced colorimetric changes (at least 5%) so it is preferable to make the conversion in the original file, if possible.
Spot Colours/ Pantones
Please let us know if you are using a spot colour / Pantone and be sure to provide its reference number.
Overprint

It is essential to check your documents by simulating overprints. This will allow you to get a preview of your file before printing. If overprint is not used properly, it can lead to printing errors (such as missing elements during printing or inaccurate colours). With some types of software, it happens that the overprint attribute is involuntarily assigned to certain objects. In order to prevent issues during printing, remember to check this option in the output preview in Acrobat.
Barcodes
Barcodes should always be in 100% black (not CMYK) on a white background. They should also be in vector format or Bitmap (in black with resolution over 450 dpi) in order to be readable by all types of barcode readers.
Printer’s Marks
For black print, we only need the crop marks. The colour bars are not needed and shouldn’t be applied. The safe zone for the text is 5mm away from the trim box. (Please make sure that you set the text at least 5mm away from the edge of the finished size). Please submit the files only with crop marks safely positioned outside the trim box.
Minimum Page Margins
In order for the text to be readable when the book is open, the binding margins should be at least 2 cm.
